

User Manual
Read this guide before use. Indoor-use power pack. Do not put fingers or hands into the product. Do not use damaged or modified battery packs. Do not disassemble the unit. Unplug before servicing. Do not expose to fire or temperatures above 130°C (265°F).
The unit is 42 kg+. Use an auxiliary transport tool if needed. Before wiring, set the power button and breaker to off. Do not install near heaters or in rain. Do not insert foreign objects into ports or vents. Keep children away. Operating range: charging -10°C - 45°C (14°F - 113°F); discharging -20°C - 45°C (-4°F - 113°F). Use only official Mango Power accessories.
Ratings are in Specifications. First-use steps are in Quick Start.
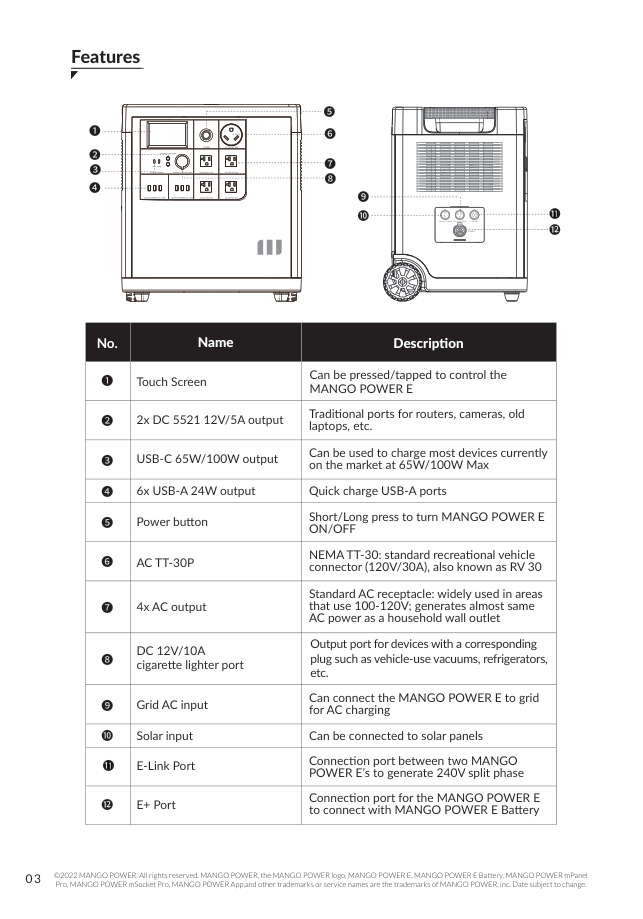
| No. | Name | Description |
|---|---|---|
| 1 | Touch screen | Press or tap to control the unit |
| 2 | 2× DC 5521 12 V / 5 A | Routers, cameras, older laptops |
| 3 | USB-C 65 W / 100 W | 65 W / 100 W max |
| 4 | 6× USB-A 24 W | Quick-charge USB-A |
| 5 | Power button | Short / long press to turn on / off |
| 6 | AC TT-30P | NEMA TT-30 RV connector, 120 V / 30 A |
| 7 | 4× AC output | 100-120 V household-style receptacles |
| 8 | DC 12 V / 10 A cigarette lighter | Vehicle vacuums, refrigerators |
| 9 | Grid AC input | AC charging from the wall |
| 10 | Solar input | Solar panels |
| 11 | E-Link port | Two E units for 240 V split-phase |
| 12 | E+ port | Connection to Mango Power E Battery |
Getting started
Section titled “Getting started”Startup: short-press the power button for 1 second. Shutdown: long-press for 5 seconds. AC and DC output are switched on the touch screen (AC / DC).
AC charging
Section titled “AC charging”Connect Grid AC Input with the included 15 A AC charging cable.
- Default charging power is less than 500 W.
- Tap Quick Charge. Default is less than 1500 W / 100 Vac, 1800 W / 120 Vac. Charging stops at 100%.
A 30 A fast-charge cable (sold separately) allows up to 3000 W. The wall outlet must support more than 30 A. With no AC input, set maximum grid input current to 30 A on the touch screen.
Solar charging
Section titled “Solar charging”Connect panels in series with the solar charging cable (MC4 to aviation). Supported input: 60-150 V DC, 20 A max, 2000 W max. Keep panel output voltage within 150 V.
E+ function
Section titled “E+ function”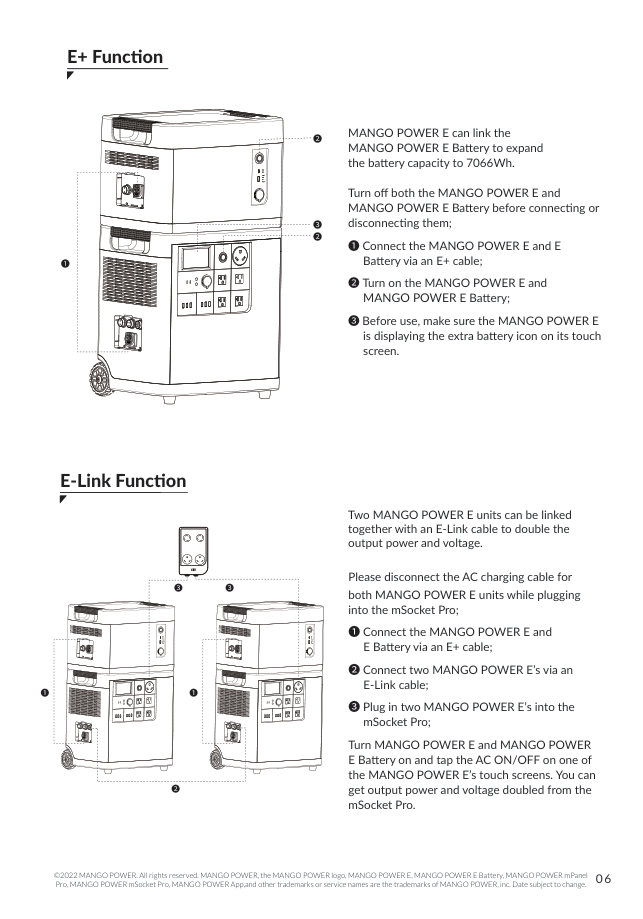
One E Battery expands capacity to 7066 Wh.
- Turn off both units before connecting or disconnecting.
- Connect with an E+ cable.
- Turn both on. Confirm the extra-battery icon on the E touch screen.
E-Link function
Section titled “E-Link function”Two E units plus mSocket Pro double output power and voltage.
- Disconnect the AC charging cable on both units before plugging into mSocket Pro.
- Connect each E to its E Battery with an E+ cable.
- Connect the two E units with an E-Link cable.
- Plug both into mSocket Pro.
- Turn the units on and tap AC on one touch screen.
App and box contents
Section titled “App and box contents”Wi-Fi and Bluetooth. Download the Mango Power App from the iOS App Store or Google Play before install.
In the box: Mango Power E × 1, AC charging cable × 1, solar charging cable × 1, quick start × 1, warranty card × 1, QC PASS certificate × 1.
Storage
Section titled “Storage”Store at 20°C - 30°C (68°F - 86°F). Do not store above 45°C (113°F) or below -10°C (14°F). For long-term storage, cycle every three months (discharge to 0%, fully recharge, then discharge to 60%). Not charging or discharging for more than 6 months voids the warranty.
Alarms
Section titled “Alarms”Tap Clear Fault on the screen or restart when the table says so. Repair is required when listed.
| Prompt | Reason | Treatment |
|---|---|---|
| PE001 | High-grid voltage | Check AC input and grid waveform; recovers in range |
| PE002 | Low-grid voltage | Check AC input and grid waveform; recovers in range |
| PE004 | High-grid frequency | Check AC input and grid waveform; recovers in range |
| PE005 | Low-grid frequency | Check AC input and grid waveform; recovers in range |
| PE006 / PE047 | High bus voltage | Recovers automatically |
| PE007 / PE048 | Low bus voltage | Recovers automatically |
| PE008 | AC overcurrent protection | Check bypass short and impulse current; Clear Fault or restart |
| PE009 | High PFC MOSFET temperature | Check ambient temperature and fan outlet; reduce power; recover after restart |
| PE010 | High temperature on DC-side MOSFET | Check ambient temperature and fan outlet; reduce power; recover after restart |
| PE012 | AC fuse failure | Repair recommended |
| PE013 | Overtemperature of the PTC thermistor | Repair recommended |
| PE015 | Low AC load voltage | Reduce load; Clear Fault or restart |
| PE016 | High AC load voltage | Check external voltage on bypass; Clear Fault or restart |
| PE017 | Frequency loss | Check AC input and grid waveform |
| PE018 | Slow startup fails | Repair recommended |
| PE019 | Grid voltage loss | Check AC input and grid waveform |
| PE021 | AC load over-power | Reduce load; Clear Fault or restart |
| PE022 | High AC load frequency | Check load frequency vs output; restart |
| PE023 | Low AC load frequency | Check load frequency vs output; restart |
| PE024 | Bypass circuit output overcurrent | Reduce bypass load; Clear Fault or restart |
| PE025 | Parallel frequencies mismatched | Match output frequencies; Clear Fault or restart |
| PE026 | PFC temperature detection abnormal | Repair recommended |
| PE027 | DC high-voltage temperature detection abnormal | Repair recommended |
| PE028 | DC low-voltage temperature detection abnormal | Repair recommended |
| PE029 | Parallel frequency factory inspection | Repair recommended |
| PE033 | High DC voltage | Check battery voltage; recover after restart |
| PE034 | Low DC voltage | Check battery voltage and load; recover after restart |
| PE035 | Short circuit on the DC side | Check load short; restart or repair |
| PE036 | Overcurrent protection on the DC side | Check load short; restart or repair |
| PE037 | Buck overcurrent protection | Check load short; restart or repair |
| PE039 | Synchronous rectification MOSFET overtemperature | Check ambient temperature and fan; reduce power |
| PE040 | PCB environment overtemperature | Check ambient temperature and fan; reduce power |
| PE041 | Battery voltage is low | Charge; reduce load; Clear Fault or restart |
| PE043 | Parallel communication disconnected | Check parallel communication line; automatic recovery |
| PE044 | EEPROM fault | Restart or repair |
| PE045 | LLC overcurrent protection | Reduce power; Clear Fault or restart or repair |
| PE046 | Internal communication fault | Restart or repair |
| Prompt | Reason | Treatment |
|---|---|---|
| BW003 | No power sign | SOC is 0; charge |
| BW004 | Full power sign | SOC is 100; stop charging |
| BW006 | Discharging overcurrent alarm | Reduce load power |
| BW007 | Charging overcurrent alarm | Reduce set charging power |
| BW008 | Battery cell temperature difference alarm | Stop charging and discharging |
| BW009 | Cell voltage difference alarm | Calibrate charging |
| BW010 | MOSFET high-temperature alarm | Stop charging and discharging |
| BW011 | Charging and discharging low-temperature alarm | Use within the specified ambient temperature |
| BW012 | Charging and discharging high-temperature alarm | Stop charging and discharging |
| BW013 / BW015 | Cell / overall low-voltage alarm | Charge |
| BW014 / BW016 | Cell / overall high-voltage alarm | Disconnect power input |
| BE004 | Battery cell protection is invalid | Send for repairs |
| BE006 | Discharging overcurrent protection | Send for repairs |
| BE007 | Charging overcurrent protection | Send for repairs |
| BE008 | Short-circuit protection | Send for repairs |
| BE010 | MOSFET high-temperature protection | Stop charging and discharging |
| BE011 | Charging and discharging low-temperature protection | Use within the specified ambient temperature |
| BE012 | Charging and discharging high-temperature protection | Stop charging and discharging |
| BE013 / BE015 | Cell / overall low voltage protection | Charge |
| BE014 / BE016 | Cell / overall over-voltage protection | Disconnect power input |
| Prompt | Reason | Treatment |
|---|---|---|
| PCS offline!!! | Inverter communication fault | Restart; repair if it remains |
| MPPT offline!!! | MPPT communication fault | Restart; repair if it remains |
| BMS offline!!! | BMS communication fault | Restart; repair if it remains |
| System fault!!! | Status switch fault | Restart; repair if it remains |
| Fan idling!!! | Fan idle speed | Repair recommended |
| CAN fault!!! | Inverter interruption fault | Restart; repair if it remains |